Remote Usability Testing Learnings
Here’s how we did our fully remote Usability Testing sessions during COVID-19 and what we learned from it.
In Somia CX, we believe that direct observation is preferable to remote as you can get immersed in the context so we hardly ever do remote Usability Testing sessions. Unfortunately, the situation provides us with no choice. We know this will not be easy, but we accepted the challenge, and here’s what we learned.
If you just want to know the setup, go to the last part of this post.
The majority of communication comes from non-verbal
The tricky thing with an online setup is that you cannot see the participant directly.
So we decided early on that we wanted to see participants so that we know how they react when interacting with our prototype. As we’re doing a mobile app, we tackled this by asking the participant to join via both Laptop and Mobile phone.
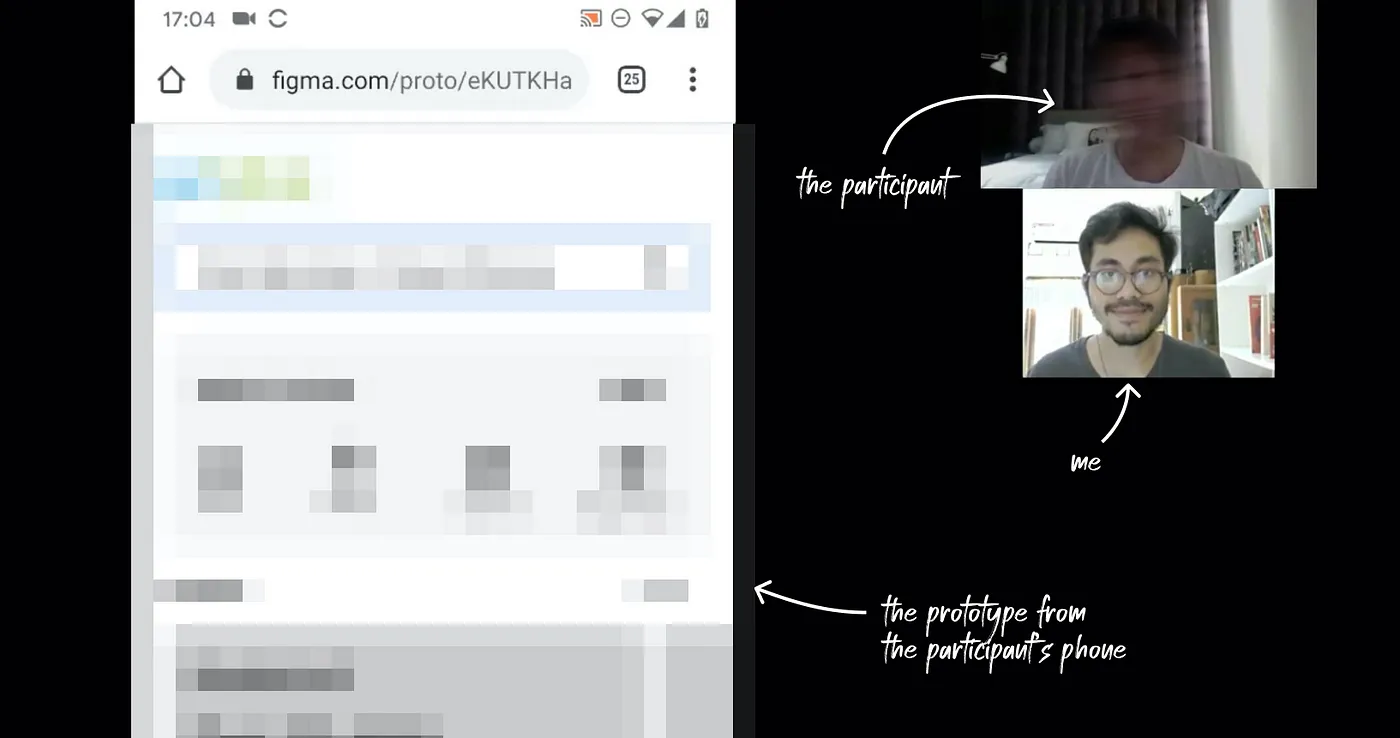
The laptop is used to cast the video of the participant while they’re using the prototype, and the mobile is used as a platform for the user to interact while being screen-shared at the same time. Both are connected to a single conference call platform so that the moderator and the observer can see both the video and screen-shared at the same time.
Of course, you can switch the other way around if you want to test a desktop app.
Streaming with voice, video, and screen
As the participants will stream three things at the same time: voice, video, and screen, we need to make sure that the participants have a decent internet connection.
In Indonesia, we generally have a very low upload stream rate compared to the download, based on my experience, they’re usually only around less than half of the download rate.
Looking at the requirements, most platforms (Zoom, Microsoft Teams, GoToMeeting) require 1 Mbps download and upload rate minimum for a conference call with both video and screen-share. That means a minimum 4G connection is required. Despite this, we usually still screen for private wifi connection availability to ensure a smooth session.
As for the platform, we’ve tried using several different platforms out there (Lookback.io, GoToMeeting, Microsoft Teams, Skype, Google Hangout/Meet, Cisco, and even TeamViewer for seeing mobile screens remotely) and convinced that Zoom is the one to go with. We chose it for multiple reasons, but in this specific context, it’s due to it:
- allows video to be displayed simultaneously with a screen-share
- allows screen sharing from mobile phone
- requires relatively low bandwidth when streaming all three simultaneously
- is easy to install; as the participant was not required to create an account and can simply join from a provided link
- has a record feature
Thinking out loud for the win
I also noticed that this is where the thinking-out-loud protocol shines. As we’re using an online setup, we don’t have a way to identify where the participant is tapping on the screen, so we need to ask them to inform us where they tap. So we make additional efforts to make sure the thinking-out-loud process is clear.
Not that I am not aware of the ability to turn on Show Tap area on Android, but it has its flaws. For (1) there’s none in iOS, (2) even if we go with Android users only, it’s troublesome to tell the user how to do it by themselves—not to mention there are a lot of different Android skin making it more troublesome for us to prepare the instruction or would take time to dingle dangle when guiding the user through the setting.
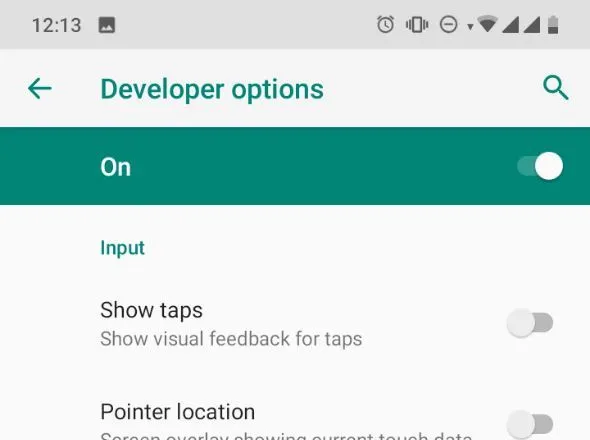
For those who don’t know where the Show Tap area (also known as Show Touches in other versions) setting is, you need to go and activate Developer Options first by tapping your Android build number in some subcategory of your setting (varies among Android skins) eight times, then open the developer option, look for the setting, and turn it on. Imagine explaining that to someone on a call.
Prepare in details
As we limited the session time to 60 minutes (one of our quick tips on remote research that you can read here), we wanted to make sure that the session ran as effectively and efficiently as possible.
We wanted to make sure our participants felt their time was valued and fully appreciated. We don’t want to waste our time fixing technical issues that we can prevent prior, or look unprepared for the session. We wanted the session to be less stressful for us. So we prepare more than we think we need.
I personally believe this is the one thing that ended up really helping us get through the session.
Not only that it make the sessions more enjoyable and less stressful for everyone, but it also helps us can focus on the content rather than the technicals during and after the session. It also makes running back-to-back sessions and their transitions much easier.
I know it’s called planning, but the way I see it, it’s about designing the experience of the study session. So that’s the way we did it. We planned by making the participant’s journey and identifying things that can go well or not during the session and preparing for it.
We started planning from the recruitment up to the end of the session:
- when we need to send an email to inform about the study, we think about the wording and what needs to be there;
- when we need to make sure the participant is ready before the session, we make the protocols and the visualized step-by-step on how to do that step;
- for the consent and non-disclosure agreement form, we make it so that it’s easy to access online (read here on how we did it).
Essentially, we planned in detail. We also make sure to do this in a single document so that we don’t have to scramble around looking for stuff and have everything we need within reach.
Then we did a pilot test of how the session runs while taking notes on things that we might have yet to cover. We did it like it was the real deal. We acted the parts and the role, we ran the whole study from the recruitment to the session. We make sure we know when to start recording, and who will record. We evaluate what to say during instructions and information parts to make sure it’s crystal clear. We even have a person enacting the role of note-taking so that we know how to do it well. This is so that we’re familiar with the setup we made and it paid well.
The overall setup
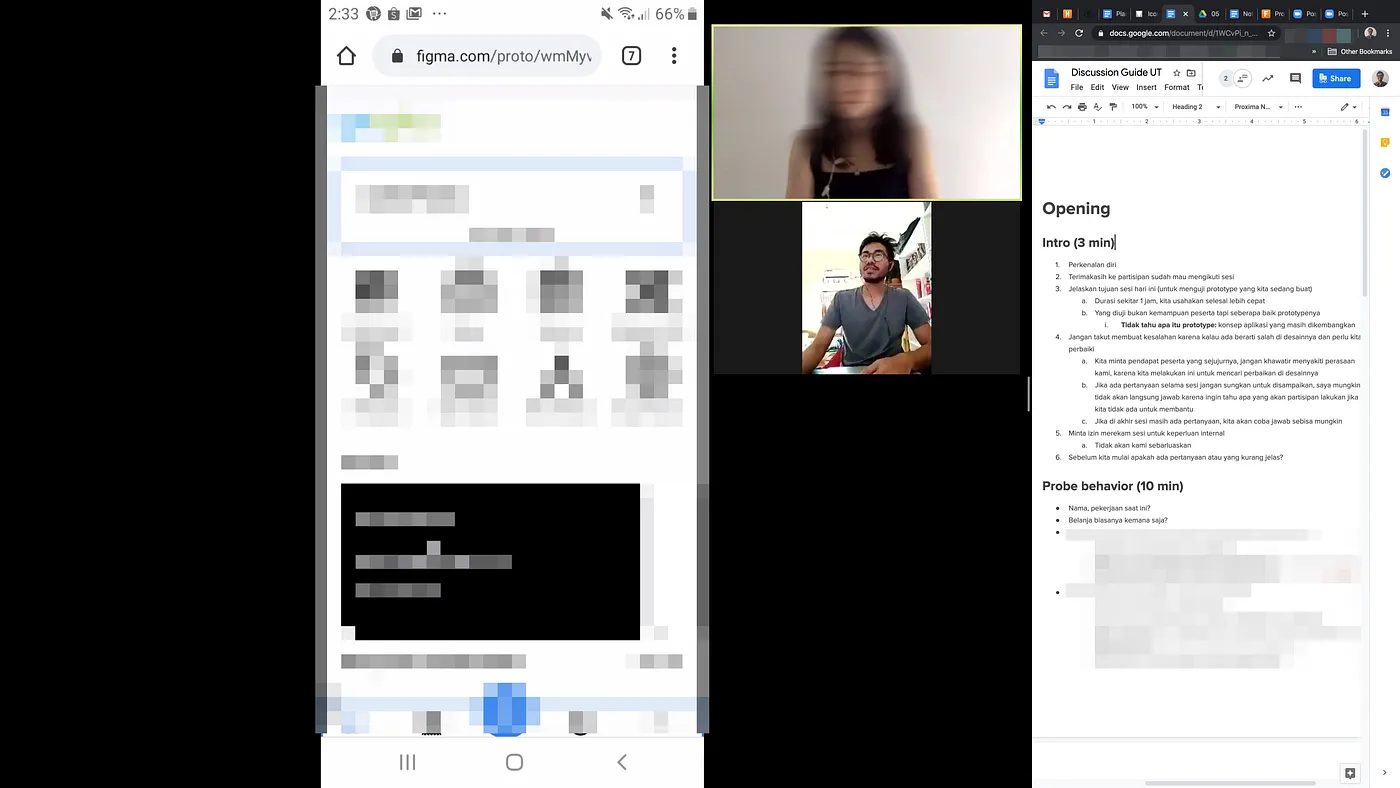
- For the reasons mentioned above, we used Zoom for the session call with each participant to have their own link and password to access their session.
- We asked the participant to join the Zoom call via both laptop and mobile phone; laptop for video capturing the participant’s face and body and use the mobile to screen-share when using the prototype.
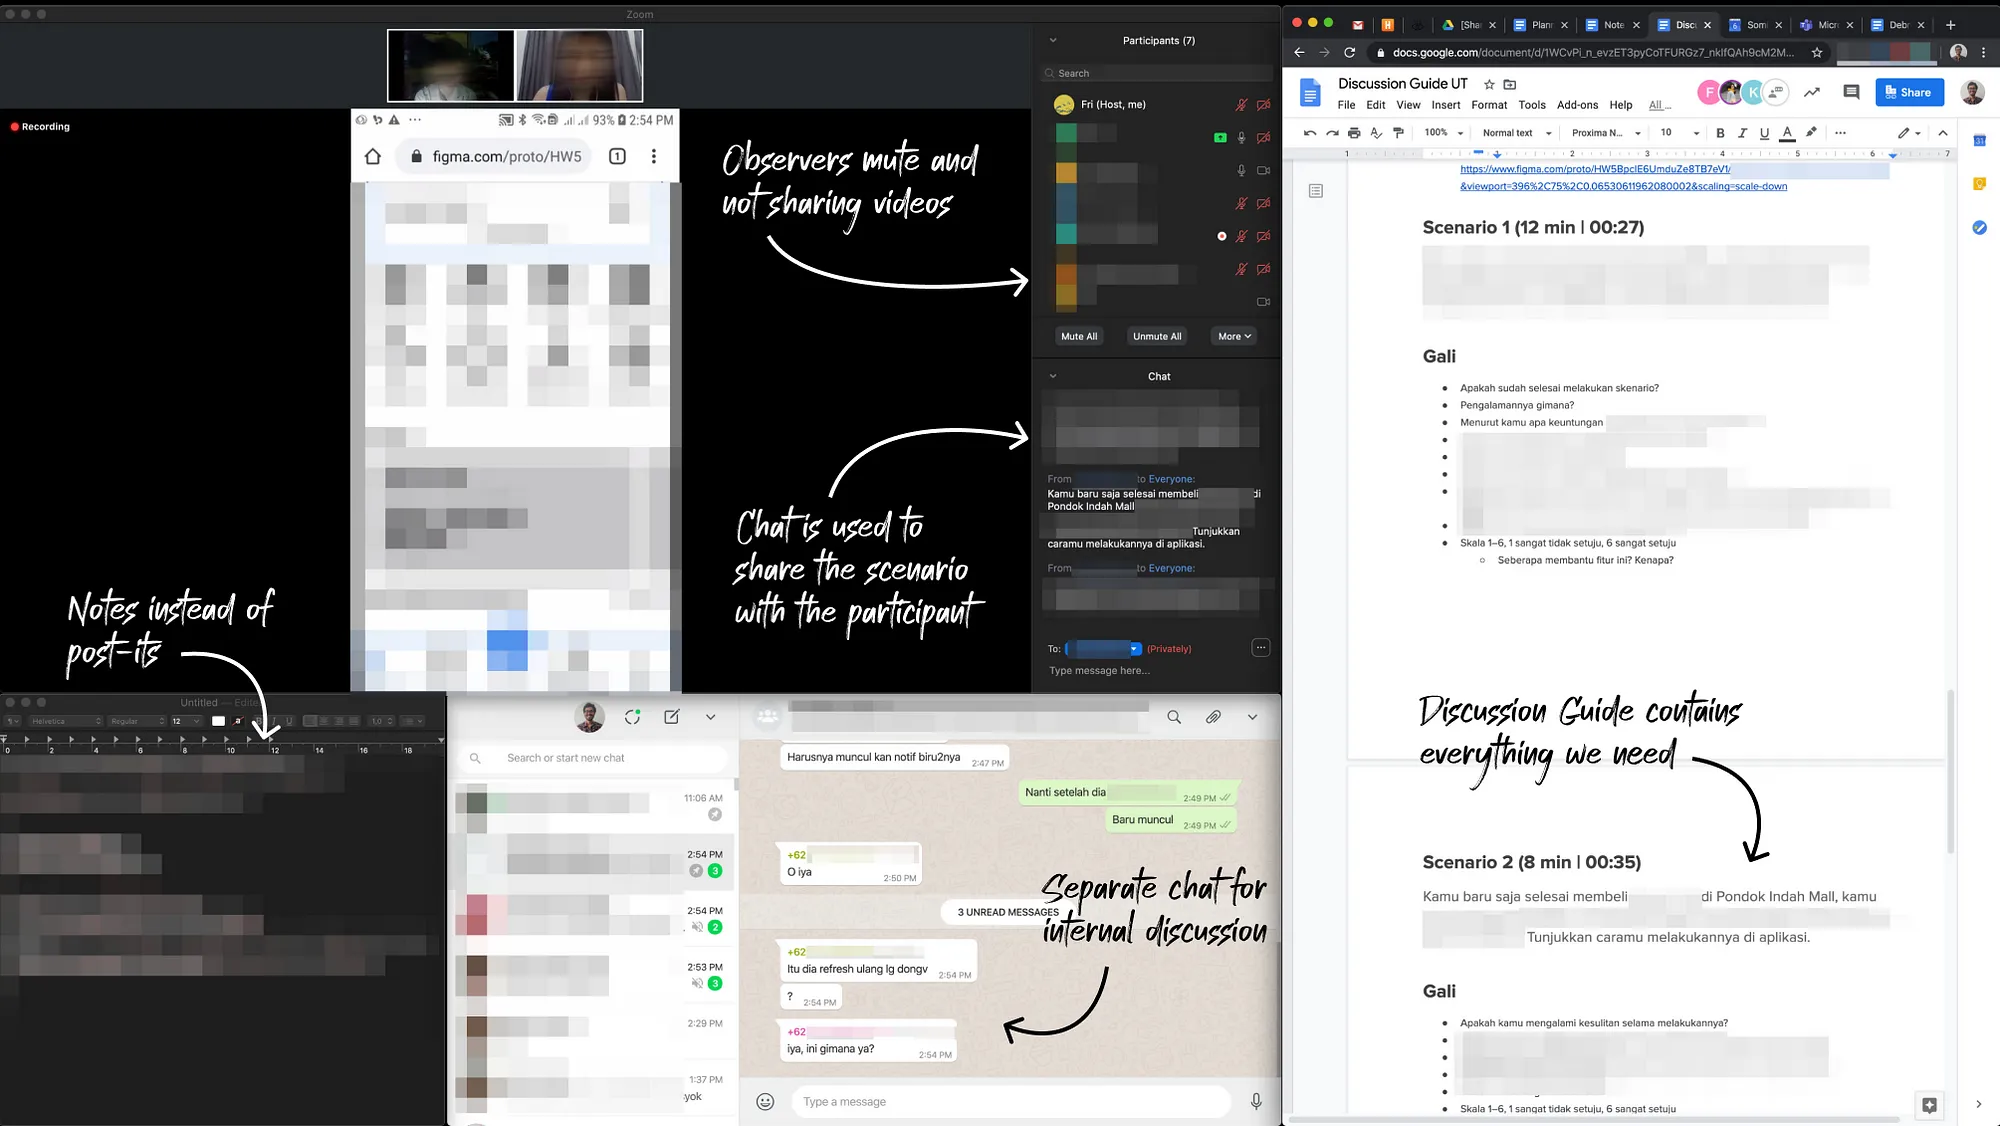
- We used one Google Docs that the moderator’s use for Discussion Guide where it contains all the information and instructions needed including but not limited to:
- links to join each session call,
- links to the prototype to be shared with the participant,
- links to document for technical preparation and troubleshooting that can be shown to the participant,
- the testing scenario itself,
- the profile of the participant as a reference.
- Split the roles of:
- recording and uploading after it ends,
- note-taking,
- making sure the participant join on time and do the technical briefing before the session starts.
- A chat platform on standby outside of Zoom so that observers can post questions to be followed up by the moderator and discuss technical issues between ourselves on the background during the session.
- As I moderate, I personally open an additional note-taking platform to note down my take-outs to be shared on the debrief session.
- Alternative call conference area to be used by the team for debriefing after the session (we used different platforms from Zoom so that we did not accidentally be heard by any of the participants—yes, we’re that cautious).